Is the Sealant Around Your Home Failing? 10 Places You Should Check Before Water Gets Through
A thin line of sealant doesn't look particularly important. Until it fails. Around a bath, shower, sink or window, sealant often sits exactly where two differen...
A thin line of sealant doesn't look particularly important.
Until it fails.
Around a bath, shower, sink or window, sealant often sits exactly where two different surfaces meet. Its job may include helping prevent water from travelling through the gap between them.
Once it starts separating, cracking or disappearing, moisture can find its way somewhere you can't easily see.
Sometimes the result is simply an untidy joint that needs renewing.
Sometimes there's already swollen timber, damaged plasterboard, mould or staining hidden behind it.
The useful habit is catching deterioration before the surrounding materials become part of the repair.
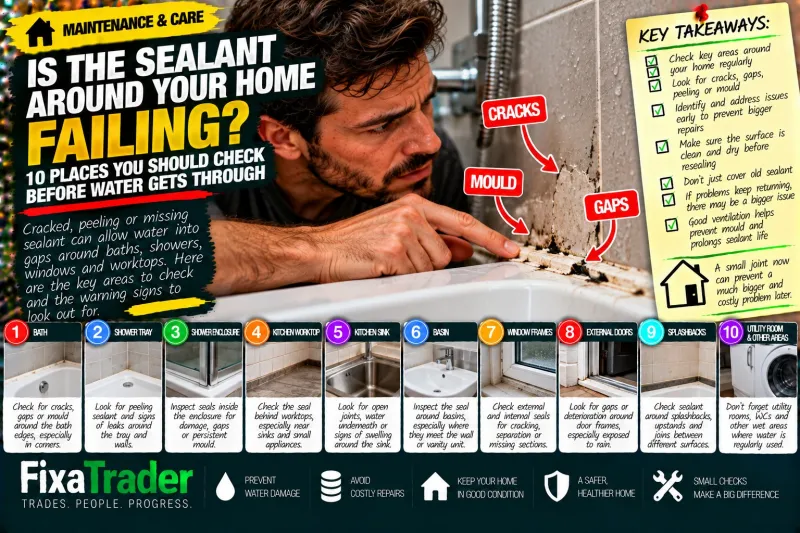
Here are ten places around the home worth checking.1. Around the Bath
The joint between a bath and the surrounding wall or tiles is one of the most obvious places to inspect.
Look closely along the entire edge.
Warning signs include:
Cracks.
Small gaps.
Sealant lifting away from the bath.
Discolouration.
Missing sections.
Or areas that remain persistently mouldy.
Pay particular attention to corners and the area around taps or shower fittings, where water may regularly collect.
If the bath also has a shower above it, the seal is exposed to considerably more water than a bath that's rarely used for showering.
A tiny opening can be difficult to notice when everything is dry.
Inspect it after normal use too, looking for areas where water appears to disappear into the joint rather than remaining on the surface.2. Around Shower Trays
A shower enclosure repeatedly exposes its seals to water.
The junction between the tray and wall therefore deserves regular attention.
If sealant begins pulling away, water may escape around the edge of the tray.
Possible warning signs elsewhere include:
Damp skirting.
Staining on the adjoining wall.
A musty smell.
Swollen flooring.
Loose finishes.
Or staining on the ceiling below an upstairs shower.
However, don't automatically assume failed sealant is responsible for every shower leak.
Water could also be escaping from pipework, waste connections, the enclosure or another part of the installation.
Replacing visible silicone without identifying the actual route of the leak can temporarily hide a bigger problem.3. Inside Shower Enclosures
Don't stop at the tray.
Look around the enclosure itself.
Different shower systems are designed to manage water in different ways, and some frames or profiles shouldn't simply be sealed everywhere a gap is visible.
Incorrectly adding sealant can potentially interfere with drainage paths designed into the enclosure.
For ordinary homeowner maintenance, focus on identifying deterioration in existing seals rather than deciding that every visible joint needs filling.
Look for:
Peeling silicone.
Separated joints.
Heavy mould that won't clean away.
Cracked material.
Or water repeatedly appearing outside the enclosure.
If you're unsure how the enclosure should be sealed, check the manufacturer's instructions or ask an appropriate installer rather than covering every opening.4. Around Kitchen Worktops
The back edge of a kitchen worktop is another important location.
Water splashes around sinks.
Kettles produce steam.
Surfaces are wiped repeatedly.
Small amounts of water can sit along the wall junction.
If that joint opens, moisture may reach areas that aren't designed for repeated wetting.
Laminate and timber-based worktop components can be particularly vulnerable if water reaches exposed or inadequately protected material.
Look behind:
The sink.
The kettle.
Small appliances.
And anything permanently stored against the wall.
These hidden sections may stay wet much longer than the visible worktop.5. Around the Kitchen Sink
The sink itself also needs checking.
Depending on its design and installation, sealing may help prevent water travelling underneath the edge.
Warning signs can include:
A visibly open joint.
Movement around the sink.
Water appearing in the cupboard below.
Swelling of surrounding worktop material.
Or persistent dampness around the edge.
Again, don't assume the seal is always responsible.
If water is appearing underneath the sink, check whether it happens:
When the tap is used.
When the bowl drains.
When water is splashed around the rim.
Or continuously.
That pattern can help distinguish between a surface sealing problem and a plumbing leak.6. Around Basins
Bathroom basins create similar conditions.
Water splashes around the tap and edge, then finds the lowest point available.
Inspect where the basin meets:
The wall.
Tiles.
A vanity unit.
Or a worktop.
A failed joint behind a basin can be particularly easy to ignore because it's partly hidden.
Look for staining, swelling, peeling finishes or mould around nearby surfaces.
If the vanity unit is made from moisture-sensitive board, repeated water exposure can cause surprisingly obvious swelling once it gets through the surface finish.
By then, simply replacing the sealant may not reverse the damage.7. Around Window Frames
Sealants aren't limited to kitchens and bathrooms.
Windows can have sealed joints internally and externally.
Externally, suitable weatherproof seals may form part of the junction between the window frame and surrounding building fabric.
Over time, exposed material can deteriorate.
From a safe position, look for:
Cracking.
Separation.
Missing sections.
Obvious gaps.
Or deterioration around the frame.
Internally, don't assume every crack around a window is simply a sealant issue.
Cracking can relate to decoration, plaster, movement or the installation itself.
Likewise, water around a window can have several causes, including condensation or defects elsewhere in the surrounding wall.
The important thing is noticing changes rather than immediately filling every gap.8. Around External Doors
Doors experience movement, weather and temperature changes.
External joints around frames can therefore deteriorate over time.
Walk around accessible doors and inspect the junction between the frame and surrounding material.
Pay particular attention to areas exposed to prevailing rain.
Possible signs of trouble include:
Visible separation.
Water staining internally.
Dampness near the frame after rain.
Deteriorating decorative finishes.
Or a gap that appears to be getting larger.
Some gaps may require more than simply applying fresh sealant.
If the frame is moving or the surrounding material has deteriorated, the underlying cause needs addressing.9. Around Splashbacks and Upstands
Kitchen and bathroom splashbacks often have sealed edges where different surfaces meet.
These joints can be forgotten because they're narrow and don't receive the same attention as a bath or shower.
Look along:
The bottom of splashbacks.
Corners.
Junctions with worktops.
Edges beside sinks.
And transitions between different materials.
The goal isn't to achieve a cosmetically perfect line everywhere.
It's to prevent water repeatedly finding its way behind finishes where the joint is intended to keep it out.
If tiles themselves are loose or grout is failing extensively, simply renewing one bead of silicone may not solve the broader problem.10. Around Utility Rooms and Other Wet Areas
Utility rooms often combine several potential water sources in a small space.
Sinks.
Washing machines.
Worktops.
Pipework.
And sometimes external doors.
Inspect the same types of junction you would in the kitchen.
Also consider less obvious wet areas elsewhere in the home.
A downstairs WC.
Boot room.
Laundry area.
Or fitted furniture around a basin.
Anywhere water is regularly used beside moisture-sensitive materials deserves occasional inspection.What Does Failed Sealant Actually Look Like?
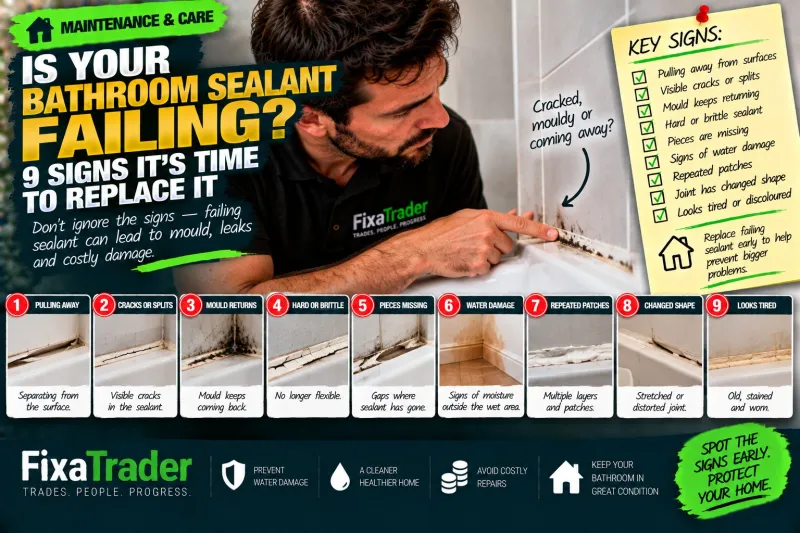
Not every old seal needs replacing immediately.
Focus on physical deterioration.
Common signs include:
Separation — the material has pulled away from one of the surfaces.
Cracking — the seal has split.
Missing sections — part of the joint is completely open.
Peeling — edges can be lifted or are visibly detached.
Loss of flexibility — material appears brittle or heavily deteriorated.
Appearance alone isn't always enough to determine whether a seal is functioning, but obvious gaps or separation deserve attention.Can You Just Put New Sealant Over the Old Sealant?
Usually, simply covering deteriorated material with another thick layer is not the best approach.
New sealant needs a suitable surface to adhere to.
If the existing material is loose, contaminated or failing, covering it may leave the underlying problem in place.
A proper renewal generally involves appropriate removal and preparation before new material is applied, following the product manufacturer's instructions.
The exact process and product depend on the surfaces and location.
Bathroom silicone isn't automatically the correct material for every joint around a property.The Surface Needs to Be Dry Enough
This sounds simple, but it matters.
If you're trying to seal a joint that is actively wet because water is leaking from somewhere else, you've skipped the important part.
Find the source first.
Likewise, trapping moisture behind a new seal can leave you with a neat-looking finish while the underlying material remains damp.
If water has already penetrated significantly, surrounding materials may need time to dry and possibly further investigation before the area is closed again.Mould Doesn't Always Mean the Seal Has Failed
Silicone can become discoloured or mouldy without having physically separated.
Bathrooms create humid conditions, especially where ventilation is poor.
So if mould repeatedly returns, look at the wider environment too.
Is the extractor fan working effectively?
Is the room being ventilated?
Does condensation remain for long periods?
Is water being left sitting on the joint?
Replacing the seal may improve its appearance, but it won't correct an underlying ventilation problem.Watch for Damage Beyond the Joint
This is where a small maintenance task can become something more significant.
Look around the area for:
Soft plasterboard.
Swollen timber.
Loose tiles.
Damaged flooring.
Peeling paint.
Persistent damp patches.
Musty smells.
Or staining in an adjoining room.
Those signs suggest you may need to investigate further rather than treating the visible seal as the entire problem.
A £10 tube of sealant can't repair water-damaged building materials.Don't Keep Resealing the Same Leak
If you've renewed the same joint several times and water keeps returning, stop assuming the sealant is the problem.
There could be:
Movement.
A plumbing leak.
A drainage leak.
An incorrectly installed shower enclosure.
Movement in a bath or tray.
Defective tiling.
Water entering from elsewhere.
Or another installation issue.
Repeated failure is information.
Something may be causing the joint to open or allowing water to bypass it.
That's when diagnosis becomes more valuable than another attempt with the sealant gun.How Often Should You Check?
You don't need a formal monthly sealant inspection.
Simply include these joints when you're cleaning or doing occasional maintenance.
Bathrooms and kitchens are easy because you're already looking directly at them regularly.
External frames can be checked during a general walkaround of the property.
A particularly useful time is before winter, when external joints will face months of wetter weather.
Also check after you notice anything unusual:
A new damp patch.
Water on the floor.
A musty smell.
Discolouration.
Or a joint suddenly appearing different.
Early investigation is generally much easier than waiting until surrounding materials visibly deteriorate.Small Joint, Potentially Bigger Consequences
Sealant is easy to dismiss because there isn't much of it.
But location matters more than quantity.
A narrow failed joint beside a shower can allow repeated water exposure behind a wall.
A small opening around a worktop can let moisture reach vulnerable board underneath.
A deteriorated external joint may expose areas intended to remain protected from weather.
Most of the time, checking these areas takes seconds.
Run your eyes along the joint.
Look for separation.
Notice cracks.
Pay attention to nearby surfaces.
And investigate repeated water where it shouldn't be.
If it's simply an ageing seal, renewal may be straightforward.
If the surrounding material is already damaged or the joint keeps failing, look deeper.
Sealant is often the smallest part of the installation — but checking it before water gets through can prevent it becoming part of a much bigger repair.
0 Comments
No comments yet — be the first to share your thoughts.