How to Bleed a Radiator Properly: A Step-by-Step Guide for Homeowners
You turn the heating on. The bottom of the radiator gets warm. The top stays noticeably colder. Maybe you can even hear a faint gurgling sound. It's tempting to...
It's tempting to assume something expensive has gone wrong, but one possible explanation is much simpler:
Air may be trapped inside the radiator.
Bleeding a radiator releases that trapped air so hot water can circulate through more of it.
For many homeowners, it's a relatively straightforward maintenance task.
But there's an important point before we start:
Not every cold radiator needs bleeding.
If you bleed radiators without understanding the symptom, you can waste time—or reduce the pressure in a sealed heating system without solving the actual problem.
So start with diagnosis.Step 1: Check Whether the Radiator Actually Needs Bleeding
Turn the heating on and allow the system enough time to warm up.
Then carefully assess the radiator.
A classic sign of trapped air is:
Warm or hot at the bottom, noticeably cooler at the top.
You might also hear bubbling or gurgling from the radiator.
That's different from a radiator that's:
Cold everywhere.
Hot at the top but cold at the bottom.
Only warm on one side.
Or behaving normally while the room still feels cold.
Those patterns can have other causes.
For example, a radiator that's cold at the bottom can sometimes be associated with deposits or circulation problems rather than trapped air.
Bleeding isn't a universal cure for every radiator problem.Step 2: Check More Than One Radiator
Walk around the property.
You may find one affected radiator.
Or several.
Make a note of which ones appear to have cold areas at the top.
If you're going to bleed multiple radiators, it makes sense to understand the overall system before starting rather than discovering another affected radiator afterwards.
This can also tell you something useful.
One radiator with trapped air may be an isolated issue.
If you're constantly finding air in several radiators, particularly soon after bleeding them, the system may deserve further investigation.Step 3: Turn the Heating Off
Before opening a bleed valve, switch the heating off and allow the radiators to cool sufficiently.
Don't bleed a radiator while you're dealing with very hot circulating water.
Apart from the obvious risk of hot water escaping, having the circulation pump running can also interfere with what you're trying to achieve.
Give the system time to settle.
You're performing a controlled release of air—not trying to create a miniature fountain of heating water.Step 4: Find the Bleed Valve
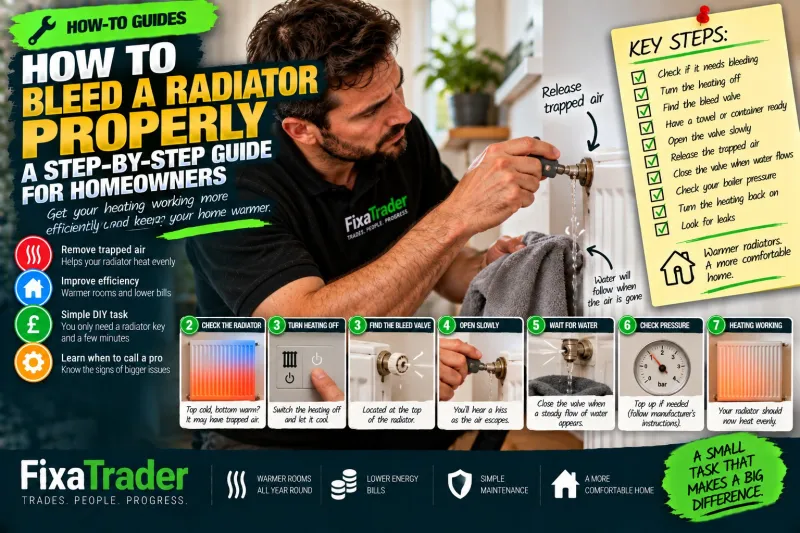
The bleed valve is normally found near the top of the radiator.
Its design can vary.
Many traditional radiator valves require a small radiator key.
Others may use a different mechanism.
Identify the actual bleed point before attempting to turn anything.
Don't loosen random fittings simply because they're near the top of the radiator.
If you're uncertain which component is the bleed valve, establish that first.Step 5: Protect the Area Around It
Even when everything goes correctly, a small amount of water may escape.
Have something ready to catch it.
A cloth or towel.
A small container where practical.
And protection for vulnerable flooring or nearby decoration.
Heating-system water isn't necessarily something you want running down a freshly painted wall or onto a carpet.
Position your cloth or container beneath the valve before opening it.Step 6: Open the Valve Slowly
Fit the appropriate radiator key or tool.
Then turn the bleed valve slowly.
You don't need to remove it.
You're opening it just enough to allow trapped air to escape.
If air is present, you'll often hear a distinctive:
Hissssss.
That's what you're looking for.
Keep your hands appropriately positioned and don't put your face close to the valve.
You're waiting for the air to leave.Step 7: Wait for Water
As the trapped air escapes, eventually water should begin reaching the bleed point.
You may initially get a mixture of air and small amounts of water.
Once the hissing stops and a steady amount of water begins to appear, close the valve carefully.
Don't leave it open unnecessarily.
And don't overtighten it afterwards.
It needs to seal properly, but excessive force can damage components.
Wipe everything dry.Step 8: Repeat Where Necessary
If several radiators showed the same cold-at-the-top symptoms, repeat the process on the relevant radiators.
There are different recommendations around bleeding order depending on system layout and circumstances, so don't become overly fixated on a universal internet rule such as:
“You must always start with this exact radiator.”
What's more important for an ordinary homeowner is:
The heating is off.
You're bleeding radiators that actually show signs of trapped air.
You're doing it carefully.
And you're checking the system afterwards.
If your heating manufacturer or installer has provided specific instructions for your system, follow those.Step 9: Check the Boiler Pressure if You Have a Sealed System
This is the step people often forget.
When you bleed a radiator, you're releasing air and potentially some water from the heating circuit.
On a sealed system, that can reduce system pressure.
Check the pressure gauge or display once you've finished.
What should the pressure be?
Follow the boiler manufacturer's instructions.
You'll often hear figures such as around 1 to 1.5 bar when the system is cold mentioned for domestic systems, but that's not a universal setting for every boiler and installation.
The correct range for your system takes priority over a generic number from the internet.Step 10: Repressurise Only if You Know the Correct Procedure
If the pressure has dropped below the manufacturer's recommended range, the system may need repressurising.
How that's done depends on the boiler and installation.
Some systems have an external filling loop.
Others use an integrated filling mechanism.
The controls and procedure vary.
Don't start opening valves beneath the boiler at random because somebody online said:
“It's one of those two silver ones.”
Consult the boiler instructions.
If you're not confident about the correct filling procedure, ask a competent heating professional.
And don't keep adding pressure simply because more seems better.
It isn't.Step 11: Turn the Heating Back On
Once the valves are closed and the system pressure is appropriate, turn the heating back on.
Allow the radiators to warm properly.
Then check the radiator you originally identified.
Has the cold area at the top disappeared?
Is the radiator heating more evenly?
Has the gurgling stopped?
If so, trapped air was likely contributing to the problem.Step 12: Check the Bleed Valves for Leaks
Don't walk away immediately.
Look at every bleed valve you've opened.
Make sure it's dry.
If necessary, wipe it with a dry tissue or cloth and check whether fresh moisture appears.
A tiny persistent leak matters.
You don't want to solve trapped air and introduce gradual water loss from the heating system.
Check again after the system has warmed.What If the Radiator Is Cold at the Bottom?
This is where people often bleed a radiator that doesn't need bleeding.
If the top is hot but the bottom remains significantly colder, trapped air isn't the obvious explanation.
Deposits inside the radiator or wider circulation issues can sometimes contribute to that pattern.
Bleeding removes air from the top.
It doesn't clean sludge or debris from the bottom.
If several radiators show circulation problems, further investigation may be appropriate.What If the Entire Radiator Is Cold?
Again, don't immediately reach for the bleed key.
A completely cold radiator can have other explanations.
For example:
A thermostatic radiator valve may not be operating correctly.
A valve may be closed.
There could be a balancing or circulation issue.
The heating controls may be affecting demand.
Or there may be a wider system problem.
The symptom matters.
Cold at the top and cold everywhere are not interchangeable diagnoses.What If You Keep Having to Bleed the Same Radiator?
Occasional trapped air doesn't necessarily indicate a serious problem.
But repeatedly having to bleed the same radiator—or regularly finding substantial air throughout the system—is worth paying attention to.
The question becomes:
Why is the air repeatedly getting there?
A heating engineer may need to assess the system rather than you continuing the cycle of:
Bleed.
Repressurise.
Bleed again.
Repressurise again.
Maintenance should solve a problem, not become a permanent ritual.What If the Boiler Pressure Keeps Dropping Afterwards?
A small pressure change after bleeding can be expected on some sealed systems because you've released something from the circuit.
Persistent pressure loss is different.
If you repeatedly restore the pressure and it repeatedly falls again, don't assume the solution is simply to keep topping it up.
Possible causes need proper investigation.
That could include water escaping somewhere in the heating system or a problem with system components.
Our earlier guide on why boilers keep losing pressure covers the possible causes in more detail, but the important point here is simple:
Repeated pressure loss isn't fixed by repeatedly adding more water.Should You Bleed Every Radiator Every Year?
Not automatically.
Routine heating checks are sensible, particularly before colder weather.
But there isn't much benefit in opening every bleed valve simply because the calendar says September.
Check how the radiators are actually performing.
If a radiator heats evenly and isn't showing signs of trapped air, bleeding it unnecessarily doesn't improve it.
Maintenance should respond to a reason.What About Towel Radiators?
Heated towel rails can also trap air and may have bleed points near their upper section.
The same general principle applies:
Identify the correct bleed valve.
Turn the heating off.
Open it carefully.
Allow trapped air to escape.
Close it when water appears.
Then check the system afterwards.
But designs vary, so follow the manufacturer's instructions for the particular radiator.When Should You Call a Heating Engineer?
Bleeding a radiator can be a reasonable homeowner task when the problem is clearly trapped air and you understand your heating system.
Get professional help if:
You aren't sure which valve to open.
The bleed valve is damaged or seized.
Water won't stop leaking from it.
Radiators remain cold after bleeding.
You repeatedly get large amounts of air.
Boiler pressure repeatedly falls.
Several radiators aren't heating properly.
You're unable to repressurise the system correctly.
Or you suspect the problem lies with the boiler or wider heating system.
For work involving the gas components of a gas boiler, use an appropriately Gas Safe registered engineer.Don't Bleed the Symptom Without Looking at the Pattern
A radiator key is a useful little tool.
But it isn't a universal heating repair device.
Start with what the radiator is telling you.
Cold at the top?
Trapped air is a reasonable possibility.
Cold at the bottom?
Think beyond air.
Cold everywhere?
Investigate why hot water isn't reaching or passing through it properly.
Needs bleeding repeatedly?
Ask why the air keeps returning.
That distinction prevents a simple maintenance task from becoming the answer to every heating problem.
And once you've finished, remember the two checks that matter just as much as releasing the air:
Is the bleed valve dry?
And, on an applicable sealed system:
Is the pressure still within the manufacturer's recommended range?
Bleeding a radiator isn't about opening a valve until water comes out—it's about recognising trapped air, releasing it safely and making sure the heating system is left operating correctly afterwards.
0 Comments
No comments yet — be the first to share your thoughts.