Should You Tile Over Old Tiles? Complete UK Guide 2025
The easiest way to book quality trades
When renovating bathrooms, kitchens, or other tiled areas, many UK homeowners face the question of whether they can install new tiles directly over existing tiles, or if they must endure the time, cost, and mess of removing the old tiles first.
Yes, you can tile over old tiles in certain circumstances, but it's not always the best approach. While tiling over existing tiles can save time and money in removal costs, it requires careful assessment of the existing installation, proper preparation techniques, and understanding of the associated risks. Success depends on the condition of existing tiles, structural capacity, and using appropriate adhesives and preparation methods.
Tiling over existing tiles involves installing new tiles directly onto old tile surfaces using specialized adhesives and preparation techniques. This approach can reduce renovation costs by £15-30 per square metre compared to removal and reinstallation, making it attractive for budget-conscious renovations.
However, experts generally recommend avoiding tiling over tile when possible, as it can create long-term problems including structural stress, adhesion failure, and complications with fixtures and fittings. Understanding when this approach works – and when it doesn't – is crucial for successful tile renovation projects.
The decision to tile over existing tiles should balance immediate cost savings against long-term risks while ensuring proper structural support and professional installation techniques that maximize the chances of successful, lasting results.
When Tiling Over Old Tiles Works (And When It Doesn't)
Success with tiling over existing tiles depends on several critical factors that determine whether this approach will deliver satisfactory long-term results or create expensive problems requiring complete reinstallation.
Ideal Conditions for Tiling Over Tiles
Solid, well-adhered existing tiles provide the foundation for successful overlay installations. Tiles must be securely stuck to the substrate with no loose or hollow-sounding areas that could compromise the new installation's integrity.
Structurally sound substrates can support the additional weight of double tile layers. Ground-level installations on concrete slabs typically handle extra weight better than elevated floors or wall installations that may have load limitations.
Simple tile layouts with flat, regular surfaces work best for overlay installations. Complex patterns, raised textures, or significantly uneven existing tiles create challenges for achieving proper new tile adhesion and alignment.
Minor cosmetic updates represent ideal scenarios for tiling over existing tiles when the underlying installation is sound but appearance needs refreshing through color or style changes.
When Complete Removal Is Necessary
Loose or failing existing tiles require complete removal before retiling. Problems with original tiles, such as becoming loose, will still be issues with the new layer, making overlay installation pointless and potentially dangerous.
Structural concerns including floor deflection, wall movement, or substrate damage necessitate complete removal to address underlying problems properly before installing new tiles.
Waterproofing issues in wet areas require complete tile removal to install proper waterproof membranes. Overlay tiling cannot address compromised waterproofing systems that may cause moisture damage. Professional bathroom wall tiling with proper waterproofing systems is essential when bathroom tiling problems require complete reinstallation.
Significant height changes from double tile thickness can create problems with door clearances, fixture installations, and transitions to adjacent flooring that may require expensive modifications.
Professional Assessment Requirements
Structural evaluation determines whether existing floors, walls, or substrates can safely support additional tile weight without deflection, cracking, or other structural problems over time.
Adhesion testing involves checking existing tile bond strength through tapping tests, visual inspection, and professional assessment to identify any areas requiring repair or removal before overlay installation.
Moisture assessment in wet areas ensures existing waterproofing remains effective and that overlay installation won't trap moisture or create conditions for mold growth behind tiles.
Building regulation compliance verification ensures overlay installations meet structural, safety, and accessibility requirements that may be affected by increased floor heights or wall thickness.
Risks and Potential Problems
Understanding the risks associated with tiling over existing tiles helps you make informed decisions while preparing for potential challenges that could affect project success and long-term performance.
Structural and Weight Concerns
Increased floor loading can stress underlying structures beyond design limits. Tiling over tiles adds equivalent of a second floor in weight, which may stress the underlying floor or support structure, particularly in larger rooms where cumulative weight becomes significant.
Floor deflection issues may develop over time as additional weight causes structural movement that can crack new tiles, cause grout failure, or create uneven surfaces affecting tile performance and appearance.
Foundation and joist stress in older properties may not accommodate additional loading, potentially requiring structural reinforcement or professional engineering assessment before proceeding with overlay installation.
Cumulative weight calculations become critical in multi-story buildings where additional tile weight on multiple floors could exceed original structural design parameters and create safety concerns.
Adhesion and Installation Challenges
Poor bonding surfaces on glazed tiles require extensive preparation including priming, abrading, or chemical etching to achieve adequate adhesion between existing tiles and new installation materials.
Need a tiling professional?
Get instant quotes from 3-5 vetted local tradespeople. Compare prices, reviews, and availability—all in one place.
Thermal expansion differences between old and new tile materials can create stress that leads to cracking, delamination, or grout failure as materials expand and contract at different rates.
Installation complexity increases significantly when working over existing tiles, requiring specialized adhesives, longer setting times, and more careful preparation than standard tile installation procedures.
Quality control difficulties make it harder to detect problems during installation, as hollow spots or poor adhesion may not become apparent until after project completion when repairs become expensive.
Long-Term Performance Issues
Hidden problem masking prevents identification and correction of underlying issues including substrate damage, moisture infiltration, or structural problems that may worsen over time.
Maintenance and repair complications arise when problems develop, as accessing substrate or correcting issues requires removing both new and old tile layers, significantly increasing repair costs and complexity.
Fixture installation challenges from increased wall thickness affect plumbing connections, electrical outlets, trim work, and accessories that may require expensive modifications or extensions.
Future renovation constraints limit options for subsequent renovations, as removal becomes more complex and expensive when dealing with multiple tile layers and potentially compromised substrates.
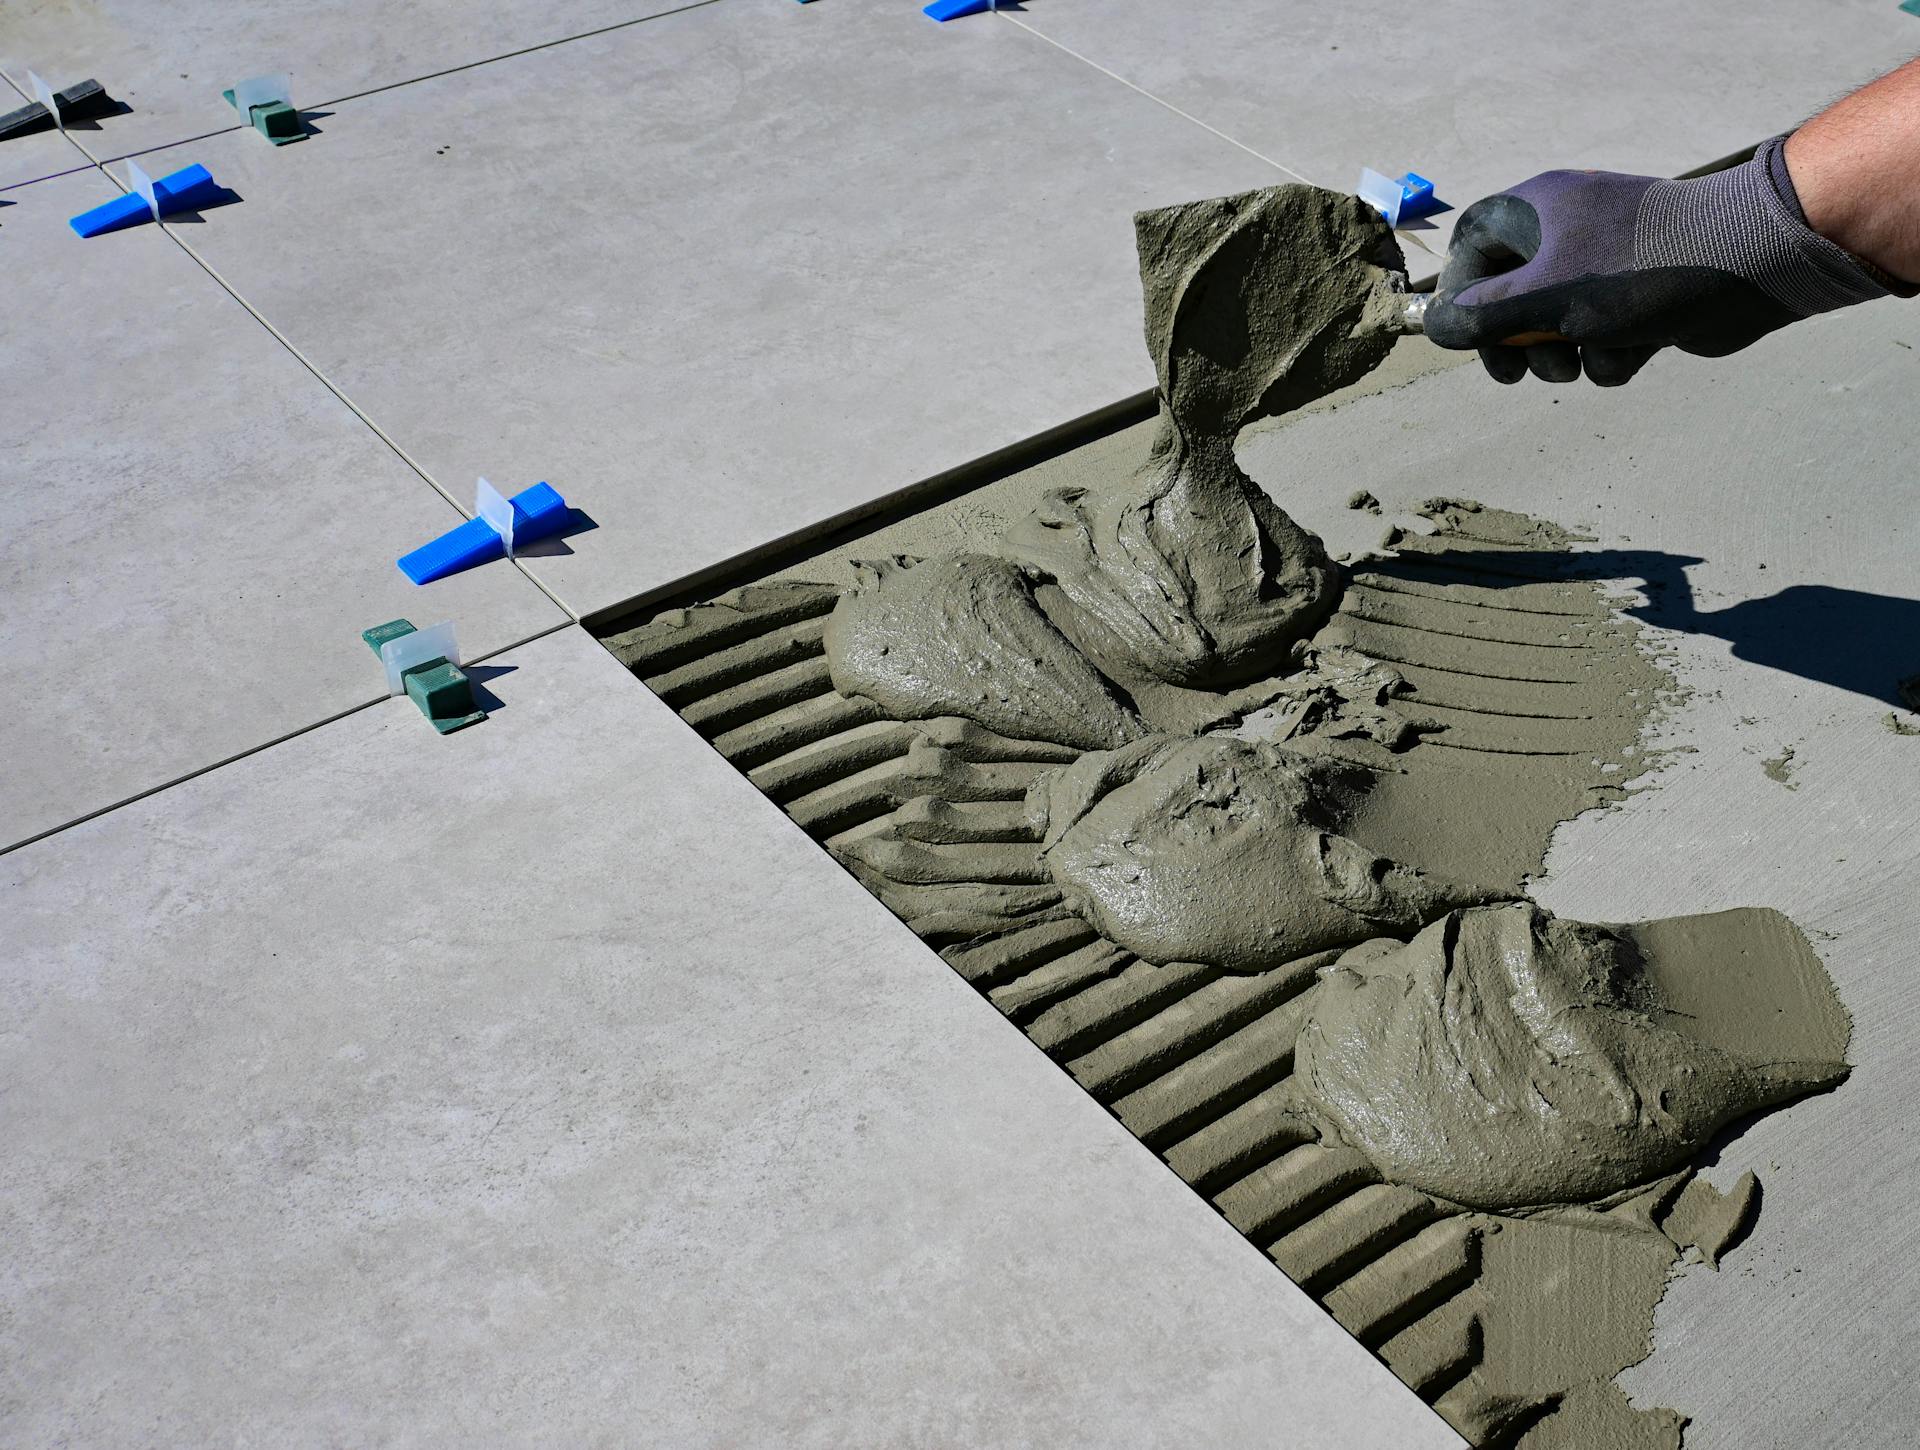
Proper Preparation Techniques and Materials
Success with tiling over existing tiles requires meticulous preparation using appropriate materials and techniques that ensure maximum adhesion and long-term performance of the new installation.
Surface Preparation Requirements
Thorough cleaning and degreasing removes soap residue, grime, and contaminants that interfere with adhesion. Use strong degreasing cleaners and allow complete drying before proceeding with preparation steps.
Abrading and scoring creates mechanical bonding surfaces on smooth, glazed tiles. Check tiles and try to smash them at cross lines, that will help adhesive stick well by providing textured surfaces for improved adhesion.
Crack and damage repair addresses any existing tile cracks, chips, or loose areas through appropriate filler materials or selective tile replacement to create uniform, stable surfaces for new installation. For minor damage, repair techniques can address cracked tiles without full replacement, allowing overlay installation to proceed on solid substrates.
Grout line evaluation determines whether existing grout requires repair, removal, or modification to accommodate new tile installation and ensure proper drainage in wet areas.
Specialized Priming Systems
Two-component primers provide enhanced bonding for challenging surfaces. Prime old tiles with two components primer that creates chemical and mechanical bonds between existing tiles and new adhesive systems.
Slurry primer applications involve mixing primer with cement to create textured bonding surfaces. For existing tiles, use 1 coat of slurry primer applied according to manufacturer specifications for optimal performance.
Specialized tile primers including products like ARDEX P 4 designed specifically for tiling over existing surfaces provide enhanced adhesion and moisture resistance critical for wet area applications.
Drying and curing time requirements must be strictly followed, with primers typically requiring 24 hours cure time before tile installation to achieve maximum bonding strength.
Adhesive Selection and Application
Flexible adhesive systems accommodate movement and thermal expansion between tile layers. Ultra Tile ProFlex SPES with extended open time and enhanced adhesion and flexibility represents ideal characteristics for overlay applications.
High-strength formulations including gel adhesives like Kerakoll H40 Gel Adhesive provide superior bonding strength for challenging installations over existing tiles.
Extended working time becomes crucial when working over tiles, as preparation and application take longer than standard installations. Choose adhesives with appropriate open times for project complexity.
Proper application techniques including back-buttering tiles, using appropriate notched trowels, and ensuring full coverage prevent hollow spots and adhesion failures that commonly plague overlay installations.
Cost Analysis: Overlay vs Complete Removal
Understanding the true costs of tiling over existing tiles versus complete removal helps you make informed financial decisions while considering both immediate expenses and long-term value implications. Use our tiling cost calculator to estimate your specific project costs based on your tile type, area, and installation method.
Immediate Cost Comparisons
Tile removal costs typically range £15-30 per square metre in the UK, depending on tile type, adhesive strength, and disposal requirements. Large projects may achieve economies of scale with lower per-square-metre costs. Understand complete UK tiling costs for different project types to make informed decisions about overlay versus removal approaches.
Overlay preparation costs including cleaning, priming, and specialized adhesives add £8-15 per square metre compared to standard tile installation, representing significant savings over removal approaches.
Time savings from avoiding removal can reduce project duration by 30-50%, lowering labour costs and minimizing disruption to household routines and property access.
Ready to hire a trusted tiling?
Compare quotes, read verified reviews, and hire with confidence. Our platform connects you with local professionals who are ready to help.
Instant Quotes
Responses within 24 hours
Verified Reviews
Real customer feedback
No Commitment
Choose when you're ready
Disposal cost elimination removes skip hire, waste disposal fees, and potential asbestos testing costs that can add £200-500+ to removal projects depending on waste quantities and disposal requirements.
Additional Overlay Costs
Specialized materials including primers, flexible adhesives, and preparation products add £3-8 per square metre compared to standard tile installation materials and techniques.
Height adjustment costs for doors, fixtures, and transitions can add £200-800+ per project when increased floor heights require modifications to maintain functionality and appearance.
Professional assessment fees for structural evaluation, moisture testing, or building regulation compliance may add £300-800 to ensure overlay installation suitability and safety.
Insurance and warranty considerations may affect coverage or require additional documentation when using overlay techniques rather than complete removal and reinstallation methods.
Long-Term Value Implications
Durability expectations for overlay installations may be reduced compared to complete removal and proper substrate preparation, potentially requiring earlier renovation or repair interventions.
Property value impact varies depending on installation quality and disclosed methods, with some buyers preferring complete renovations over overlay approaches for long-term confidence.
Future renovation costs increase significantly when overlay installations eventually require complete removal, as multiple tile layers complicate and expensive removal and substrate restoration work.
Warranty and guarantee limitations may apply to overlay installations, potentially reducing recourse options if problems develop compared to complete removal and professional reinstallation approaches.
Step-by-Step Installation Guide
Following systematic installation procedures maximizes success chances when tiling over existing tiles while ensuring proper preparation, application, and finishing for optimal long-term performance.
Pre-Installation Assessment and Planning
Comprehensive tile evaluation involves tapping each tile to identify hollow or loose areas, checking grout condition, and assessing overall installation integrity before proceeding with overlay preparation.
Structural capacity verification includes checking floor deflection, wall stability, and load-bearing capacity through professional assessment or building regulation consultation when dealing with significant additional weight.
Material calculation and ordering accounts for specialized primers, adhesives, and additional tile quantities needed for overlay installation while considering waste factors and project complexity.
Tool and equipment preparation includes specialized grinding equipment, high-quality primers, flexible adhesives, and appropriate safety equipment for preparation and installation procedures.
Surface Preparation Implementation
Thorough cleaning protocol removes all soap residue, grime, and contaminants using strong degreasing agents followed by complete rinsing and drying before proceeding with mechanical preparation.
Mechanical surface preparation involves controlled abrading of smooth surfaces to create bonding texture while avoiding damage to underlying substrates or structural elements.
Crack and repair completion addresses any damage through appropriate repair compounds, allowing full cure time before proceeding with primer application and final installation steps.
Quality control inspection ensures all preparation meets specification requirements through systematic checking of surface texture, cleanliness, and structural integrity before primer application.
Primer and Adhesive Application
Primer mixing and application follows manufacturer specifications exactly, ensuring proper coverage, consistency, and cure time for optimal bonding between existing surfaces and new installation materials.
Adhesive selection verification confirms appropriate product choice for specific conditions including tile size, substrate type, and environmental conditions affecting installation performance.
Professional application techniques include proper mixing, appropriate notched trowel selection, and systematic coverage ensuring optimal bonding without air pockets or thin spots.
Installation timing coordination manages adhesive open times, working sections, and environmental conditions to maintain optimal bonding conditions throughout the installation process.
Final Installation and Quality Assurance
Systematic tile installation follows professional techniques including proper spacing, alignment, and setting procedures while monitoring adhesive transfer and bonding quality.
Grouting and finishing uses appropriate materials and techniques for overlay installations, ensuring proper curing and sealing for long-term performance and moisture resistance.
Final inspection and testing verifies installation quality through systematic checking of tile adhesion, alignment, and finish quality while documenting any issues requiring attention.
Maintenance guidance provision includes specific care instructions for overlay installations and warranty information covering both materials and workmanship for customer protection.
Professional vs DIY Considerations
Deciding between professional installation and DIY approaches for tiling over existing tiles requires careful evaluation of complexity, risk factors, and skill requirements specific to overlay installations.
Professional Installation Advantages
Specialized expertise in overlay techniques ensures proper assessment, preparation, and installation using proven methods that maximize success chances while avoiding common pitfalls.
Professional material access provides access to commercial-grade primers, adhesives, and tools specifically designed for challenging overlay applications that may not be readily available to DIY installers.
Insurance and warranty protection covers both materials and workmanship while providing recourse for problems that may develop, protecting homeowner investments through professional accountability.
Regulatory compliance assurance ensures installations meet building standards, safety requirements, and local regulations while managing any approval or inspection requirements professionally.
DIY Approach Considerations
Skill level requirements for successful overlay installation exceed standard tiling skills, requiring experience with surface preparation, specialized materials, and problem-solving capabilities.
Tool and equipment investment may be substantial for proper preparation tools, specialized adhesives, and safety equipment needed for quality overlay installation results.
Time and complexity factors significantly exceed standard tile installation requirements, with preparation and installation taking 50-100% longer than anticipated by inexperienced installers.
Risk acceptance and problem resolution capabilities become crucial when issues arise, as DIY installers must diagnose and correct problems without professional support or expertise.
Quality and Outcome Expectations
Professional standards typically achieve better long-term results through proper assessment, preparation, and installation techniques backed by experience and specialized knowledge.
Cost-benefit analysis should consider not just immediate savings but also long-term performance, warranty coverage, and potential correction costs if problems develop.
Project complexity assessment helps determine whether specific installations exceed reasonable DIY capabilities based on substrate conditions, tile types, and environmental factors.
Support and guidance availability varies significantly, with professional installations providing ongoing support while DIY approaches rely on homeowner problem-solving capabilities.
Making Your Tiling Decision
The decision to tile over existing tiles requires careful evaluation of multiple factors including structural capacity, existing tile condition, cost considerations, and long-term performance expectations for successful renovation outcomes.
Key factors for successful overlay tiling:
- Existing tile condition must be excellent with strong substrate bonding
- Structural capacity sufficient to support additional weight safely
- Proper preparation using specialized primers and techniques
- Professional assessment for complex or high-risk installations
- Realistic expectations about limitations and potential issues
While tiling over existing tiles can save £15-30 per square metre in removal costs, success depends on thorough preparation, appropriate materials, and realistic assessment of suitability factors.
When overlay tiling works best:
- Solid, well-bonded existing installations
- Ground-level concrete substrate installations
- Minor cosmetic updates with compatible tile sizes
- Budget-conscious renovations with suitable conditions
When complete removal is essential:
- Loose, failing, or damaged existing tiles
- Waterproofing issues or moisture problems
- Structural concerns or substrate damage
- Significant height change implications
The choice between overlay and removal should prioritize long-term performance over short-term savings, with professional consultation recommended for complex installations or when structural, moisture, or regulatory concerns exist.
Professional installation typically costs £25-45 per square metre for overlay tiling versus £40-65 per square metre for complete removal and reinstallation, making overlay attractive when conditions permit successful implementation through proper techniques and realistic expectations.